
Since buying a rotating cake decorating stand and a decorating kit, I’ve been itching to try my hand at another layer cake. I figured this was my last chance to do any baking for my old coworkers, and I should go out with a bang; so I decided upon the following recipe found at smittenkitchen.com:
I’m actually not a huge fan of yellow cake with chocolate frosting. Given several selections of flavors, yellow cake with chocolate frosting would actually be my last choice. That’s precisely why I decided to make it. I needed to add more cake flavors to my baking repertoire. And truthfully I was hoping this recipe would dazzle me and change my perspective of yellow cakes.
I encountered a few problems while making this cake; the first being that I doubled the recipe to make a bigger cake without a sufficient mixer for such a large recipe. Personally, I would not recommend making this recipe unless you have an industrial sized Kitchenaid (or something similar) mixer. Or at least one that’s bigger than the standard size one that I own. By the time I was able to start incorporating the dry ingredients into the wet ingredients, I was doing so in the mixer and a side bowl as it would not all fit in the mixer. (Not recommended!)
Out of laziness I threw all three pans onto the same rack in the oven (no bother adjusting the racks in the oven — that’s too much trouble! Plus I had already heated the oven without checking the rack positions…)
Perhaps my laziness is the reason the cakes didn’t rise? In fact, they sunk in the middle. Never before have I made a cake that sunk in the middle (banana bread, all the time — yes — but not cake!)
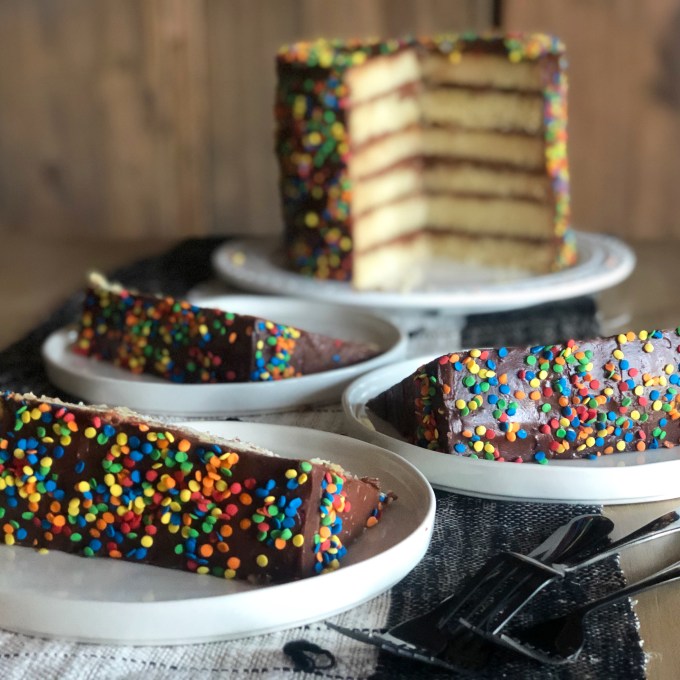
Despite the fact that I had doubled the recipe and squished it into three 8×8″ square pans, curiously I did not need to cook the cake any longer than recommended in the recipe. Two of the pans were done at 35 minutes, the third at 40. Also, the cake just looked funny. I’m not going to be over-dramatic and say the cake looked like Swiss cheese, but let’s just say there seemed to be more air pockets/holes in it than you would expect. (Yes, I dropped the cake on the counter to ensure that did not happen while simultaneously getting cake splatter on my face and in my hair.)
During the cooling of the cakes, I decided to level one of the layers (the top layer). I decided since the cakes were inverted and sunken in, it would be the perfect place to nestle extra chocolate frosting. (Who doesn’t like lots of frosting?) I leveled the top layer by chiseling off the edge of one of the layers tasting the cake as I chiseled. The cake tasted OK, but I was still skeptical (it was sunken in the middle, too hole-y, and, in general, looked nothing like the picture from the website).
At this point I had decided this cake might just end up being the perfect cake to practice making rose petals out of frosting — definitely not a masterpiece. Definitely not a cake to change my viewpoint on yellow cakes.
Despite the possible failure of the cake, I was excited about the frosting. I’ve made a Death by Chocolate cake that uses a chocolate sour cream frosting and loved it (though I seem to remember it was somewhat hard to spread). I made the cakes at two in the morning and decided to frost them the next day; so after they had cooled completely, I gingerly stuck them inside a Ziploc bag and threw them in the freezer. (I say gingerly because as I was taking the cake out of the pan, I felt like if I made one false movement, the cakes could very easily crack or splinter.)
I should have known by the hiccups I ran into while making the cake that the frosting of the cake would be problematic as well. There were several new tools I was excited about incorporating during my frosting and decorating of the cake; the first being the rotating cake stand which I knew would make frosting the cake a breeze. In actuality, I found it a bit clumsy and hard to maneuver. The stand kept turning when I didn’t want it to and switching directions. Not used to having a rotating cake stand, I kept forgetting to use the rotating feature (except when it decided to rotate on its own).
The next nifty decorating tool I attempted to use was an icing sculptor. Essentially an icing sculptor is a block that you plug eight plastic pieces with various shaped edges in and scrape along the side of the cake to produce a design. To use this accessory, you must have a steady hand, which I don’t. This was evident when I tried to use it. Also one of the plastic pieces would not sit securely into the sculpting block. (Thank God the loose piece was at one end of the block. It would have been disaster if it had fallen out of the middle.) Despite the deficiencies noted above, I did rather enjoy using this tool, and I’m excited to use the other designs in the kit.
Of all the decorating tools that I recently purchased, I was most excited to use the pastry bags and tips that came in a decorating kit (by Wilton). I planned on making elaborate borders, edges, and possibly even rose petals, if my learning curve allowed for it. (It didn’t. But it wasn’t really my fault.)
I ran into several problems while using the pastry bags, the first of which was the bags were too small. They barely fit any frosting in them and because the bags were so small, it was hard to load the frosting in it. I kept piling too much frosting in them. Too much frosting in the bag ensures that while piping or zigzagging or dotting the cake with frosting, frosting is coming out of both ends of the bag. This is not what you want. I had frosting shrapnel up to my elbows while trying to control these pastry bags.
On top of the size deficiency, I had a lot of problems with the consistency of the frosting. Of the three batches of frosting I made, the first one was the only one that turned out smooth and creamy. The other two were rather lumpy. Because of the lumps in the frosting (tiny, hardened bits of chocolate), the tips kept getting clogged, which resulted in even more frosting coming out the wrong end of the bag. After three hours of attempting to make zigzags, then ribbons (could not figure that pattern out), then dots; I threw in the bag. (I actually threw the pastry bags into the garbage.) The cake was 3/4 of the way decorated and looked a bit like crap, but I was too tired and frustrated and sick of licking frosting off my hands and arms to continue.
Thank God all this effort wasn’t in vain.
I invited my friend Gil over to taste the cake (he took the rest of it home with him to bring into work in the morning), and I was happy to cut into a moist yellow cake with thick layers of chocolate frosting that didn’t look pretty but tasted damn good. I would definitely make this recipe again, however, I would slice the layers in half to make six layers of cake. (What can I say? I like a lot of frosting in every bite of my cake!)
ingredients.
- 8 c. plus 4 T. cake flour (not self-rising)
- 4 tsp. baking powder
- 3 tsp. baking soda
- 2 tsp. salt
- 4 sticks (2 c.) butter, softened
- 4 c. sugar
- 4 tsp. pure vanilla extract
- 8 large eggs, at room temperature
- 4 c. buttermilk, well-shaken
directions.
- Preheat oven to 350°F. Butter three 9-inch cake pans and line with parchment paper or wax paper, then butter parchment or wax paper and dust with flour.
- Sift together flour, baking powder, baking soda, and salt in a medium bowl. (I usually don’t bother to sift the dry ingredients and the cakes seem to turn out fine.
- In a large mixing bowl, beat butter and sugar with an electric mixer at medium speed until pale and fluffy, then beat in vanilla. Add eggs 1 at a time, beating well and scraping down the bowl after each addition.
- At low-speed, beat in buttermilk alternating with flour mixture in three batches, mixing until each addition is just incorporated.
- Spread batter evenly in cake pans, then drop pans on counter several times to eliminate air bubbles.
- Bake until golden and a wooden pick inserted in center of cake comes out clean, 35 to 40 minutes.
- Cool in pan on a rack 10 minutes, then run a knife around edge of pan. Invert onto rack and discard parchment, then cool completely, about 1 hour.
chocolate sour cream frosting ingredients.
Makes 10 cups of frosting, or enough to frost and fill a 6 layer 9-inch cake
- 2 lb semi-sweet or bittersweet chocolate, chopped
- 3 c. sour cream, at room temperature
- ½ to 1 c. light corn syrup
- 2 tsp. vanilla extract
chocolate sour cream frosting directions.
- Melt chocolate in a double boiler or in the microwave: Melt the chocolate on high for 60 seconds, stirring well, and then heating in 30 second intervals, stirring in between each interval, until the chocolate is melted. Remove from heat and let chocolate cool until tepid.
- Whisk together the sour cream, 1/4 cup of the corn syrup and vanilla extract until combined. Add the tepid chocolate slowly and stir quickly until the mixture is uniform. Taste for sweetness, and if needed, add additional corn syrup in one tablespoon increments until desired level of sweetness is achieved.
- Let cool in the refrigerator until the frosting is a spreadable consistency. This should not take more than 30 minutes. Should the frosting become too thick or stiff, just leave it out until it softens again.
To assemble the cake, I like to throw my cake layers in the freezer a bit before handling. I find they are easier to cut and cuts down on the crumbs when slathering with frosting. This recipe yields a very thick layer of cake, which is why I recommend slicing the layers in half to get a six-layer cake. If you have any uneven layers, this is your chance to even them out. This cake tends to sink a bit in the middle and I find that I always have to slice off the edges of the cake.
Before you start assembling, cut 3 or 4 thin slices of wax paper and lay them around the edges of the plate or the cake stand you’re using for assembly. What you want is for the wax paper to stick out beyond the edge of the cake so that if you drop frosting onto your plate while frosting, you have easy clean up later–you just remove the piece of wax paper.
Place one layer of cake on top the cake plate/stand lined with wax paper. Add a generous amount of frosting and spread across the cake layer leaving about ½ to ¾ inch margin of around the edge of the cake. As you add layers, it will push the frosting out toward the edge so don’t worry about the cake being “dry” at the edges. Repeat this process until you get to the last layer and then go ahead and lay down a very thin layer of frosting on top of the cake and the sides. Place cake in the fridge for 30 to 60 minutes or until the cake looks set, then remove and add a second layer of frosting. Repeat this process a third time if you still have more frosting, or you can throw some of that frosting into a piping bag and pipe some frosting in any decorative pattern your heart desires.
Recipe rating:


