Last week my friend and coworker Colette commissioned me to bake a cake for her for a birthday party she hosted tonight. When I agreed to do it I was at once excited and petrified. Before I even agreed I cautioned Colette that I’m horrible at decorating cakes; to which Colette responded, pshhhhh. As long as the cake tasted good, Colette promised she was fine with whatever cake flavor I was going to make and to whatever creative genius I could apply to decorating it.
We agreed upon my Best Red Velvet Cake . I promised her it’s always a crowd pleaser and I truly believe that it is. I’ve never heard anything but praise after serving this cake.
Since I was commissioned to make this cake for a very special birthday party, I wanted to come up with an alternative and eye catching decoration. In a recent issue of Food Network Magazine, I saw a recipe for a chocolate cake layered with chocolate bark on the sides of the cake. I figured this would be my best and easiest bet at making an impressive-looking cake.
Then my mind drifted a bit further and I came up with an idea to make Happy Birthday! bark, which would be even better and perfect for the occasion.

ingredients.
- bittersweet or semi-sweet chocolate chips (approximately 1 c.)
- vanilla melty’s (or if you must, white chocolate chips)
- household wax or vegetable oil (if you must use white chocolate chips)
directions.
- In a double boiler, melt Vanilla Melty’s over low heat until completely melted. If using white chocolate chips you’ll need to add some household wax or vegetable oil to thin it out. White chocolate does not melt easily.
- Meanwhile, in a small bowl microwave bittersweet or semi-sweet chocolate chips at 30 second intervals until completely melted (about 1 1/2 to 2 minutes).
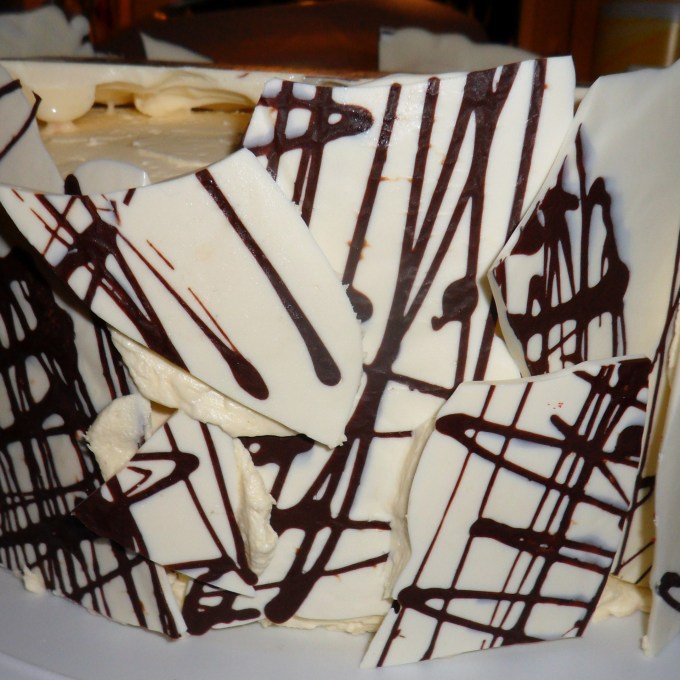
- To make decorative chocolate bark: line a cookie sheet with wax paper. Once chocolate chips are melted, scrape melted chocolate into a Ziploc baggy. Snip a small hole in one corner of the baggie. Drizzle chocolate in zig zags lengthwise across the sheet of wax paper. Rotate the cookie sheet 90 degrees and drizzle chocolate in a zig zags to form a cross pattern. Let cool completely. (Throw in the freezer if you’re in a hurry.) Pour melted white chocolate over the zig zag pattern to cover completely and let cool completely (stick in the freezer again).

Once the chocolate has cooled remove the wax paper and break into pieces (bark).
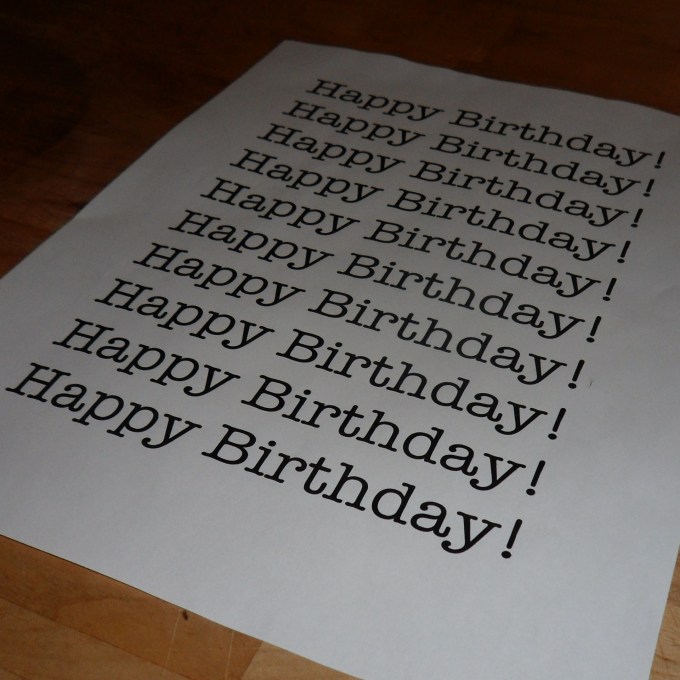
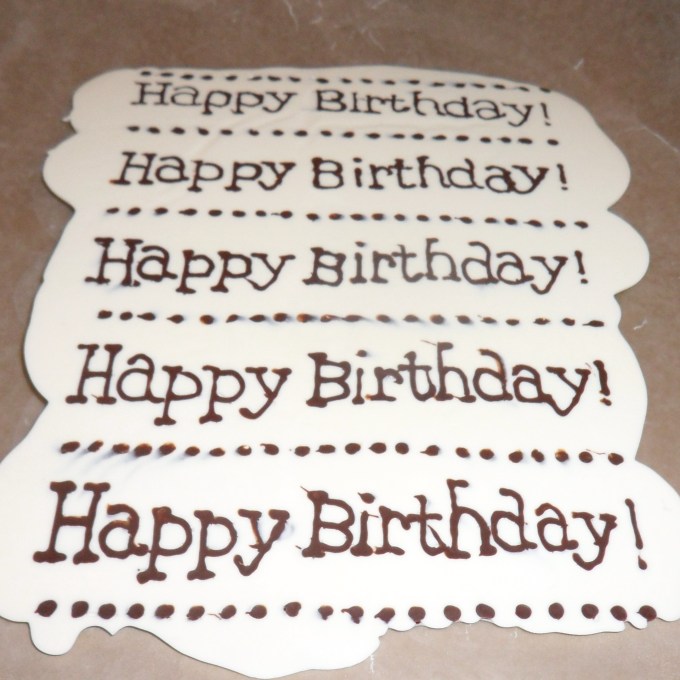
- To make Happy Birthday! bark: Print ‘Happy Birthday!’ (in whatever font you like at a size that will allow you to have the biggest font that fits on one line) center justified as many times on the page that will fit on a piece of printer paper – if you have clear ‘overhead paper’ that would be more ideal.

- Flip the page over and place on a cookie sheet. Cover with waxed paper. Once chocolate chips are melted, scrape melted chocolate into a Ziploc baggy. Snip a small hole in one corner of the baggie. Pipe the chocolate to trace the backward letters of Happy Birthday! Repeat until you’ve done the entire page.

- Let cool completely. Pour melted white chocolate over the zig zag pattern to cover completely and let cool completely (stick in the freezer again).

- Once the chocolate has cooled remove the wax paper and break into pieces (bark).
- To decorate: place pieces of bark (overlapping) around the sides of the cake trying to cover as much of the frosting as possible. Allow some of the bark pieces to stick up over the top of the cake, if desired. If you have more bark than will cover the cake, slather some frosting on the back of the bark and stick directly to other pieces of bark for a layered effect.
I cannot count on two hands how many hours this cake took me to complete. Primarily because I had to make two cakes. That’s right. Two cakes.
The first cake slid off the roof of my car and landed on the ground outside work. And though the cake didn’t hit the ground, the bark shattered into tiny pieces and fell off the cake. Plus the frosting cracked! In short, I thought the cake looked like poo once it landed on the ground.
I toiled over trying to fix the fallen cake or make a new one and ultimately decided on making a new one. Morally I couldn’t present a cake that looked like poo when getting paid to make it no matter how great it tasted when sliced into. So I spent all Friday and the majority of today making the second cake, which I’m happy to say, turned out even better than the first.
The cake got rave reviews! Colette was thrilled when she saw it (I knew she would be); and actually said to me, I thought you didn’t know how to decorate cakes? when I presented it to her. Everyone at the party thought a professional baker had made the cake. Tee hee hee! I was very pleased with the outcome and even more pleased by the reactions of Colette and other party goers.
A few tips:
*If you live near a Winco, you must buy Vanilla Melty’s (found in their bulk goods section). They melt so freaking fast and easy it’s amazing. You will need a lot of melted white chocolate. My guess if four to six cups, but it could be more. I had to melt a few batches because I kept running out. It’s important to melt on low. If the chocolate is too hot you run the risk of it melting the chocolate piping already on the wax paper which will distort your lettering or design.
*It may be worth it to use a pastry bag instead of a Ziploc baggy. I had huge problems trying to pipe the chocolate. When tracing letters, you need to have a very tiny hole. Too big and the chocolate will pour out too fast. This makes it impossible to trace letters. It’s easier to pipe chocolate after it’s cooled a bit. It won’t flow out so fast. (Even when using a quality Ziploc baggy, I still had an explosion of chocolate, which ruined a portion of my Happy Birthday! bark.)
*About two ‘pages’ of Happy Birthday! bark is enough to decorate a six-layer cake.
*If you’re making Happy Birthday! (or any other congratulatory) bark, start at the top and move from the opposite side of the paper of your strong hand so that you don’t smudge the chocolate. For example, I’m right-handed so I started on the top left side. The most important part about tracing is the very first line, especially if you’re using regular printer paper. It’s not easy to see through paper (especially when you have wax paper covering it). If you can get the first backward Happy Birthday! on the page, you have a visual to look at as you continue on piping chocolate down the rest of the page.
Recipe rating:


