Unfortunately I wasn’t able to make a large Thanksgiving dinner this year (as I have the past few years). Because I missed my chance on Thanksgiving, I wanted to make a traditional Thanksgiving dinner for Christmas. (Thanks, Mom, for the nice new Calphalon roasting pan!)
I’ve never roasted a turkey before so of course I was a bit nervous to do so. I’ve heard many people lament over a dried out bird. I found a recipe on one of my go-to websites for a roast turkey recipe that is supposed to ensure that the meat doesn’t get dried out.
ingredients.
- 1 turkey, approx. 15 lbs
- Juice of half a lemon
- Salt and pepper
- Melted butter
- 1 Large yellow onion, peeled and quartered
- Tops of a bunch of celery
- mini carrots
- Parsley
- Sprigs of fresh rosemary, thyme
directions.
- To start, if the turkey has been refrigerated, bring it to room temperature before cooking. Keep it in its plastic wrapping until you are ready to cook it. While in the refrigerator, and or while you are bringing it to room temp, have the bird resting in a pan, so that if the plastic covering leaks for any reason, you are confining the juices to the pan. If you get a frozen turkey, you will need to defrost it in the refrigerator for several days first. Allow approximately 5 hours of defrosting for every pound. So, if you have a 15 pound turkey, it will take about 75 hours to defrost it in the refrigerator, or around 3 days.
- Handle a raw turkey with the same amount of caution as when you handle raw chicken – use a separate cutting board and utensils to avoid contaminating other foods. Wash you hands with soap before touching anything else in the kitchen. Use paper towels to clean up.
- Remove the neck and giblets (heart, gizzard, liver). Use the heart and gizzard for making stock for the stuffing. The neck can be cooked alongside the turkey or saved for turkey soup. Or all of the giblets can be used for making giblet gravy.
- If your turkey comes with a plastic piece holding the legs together, check the instructions on the turkey’s package. Most likely you do not need to remove those plastic ties for cooking (unless you plan to cook your turkey at a very high temperature). If you remove the plastic ties (as I did before reading the instructions), you will need to use kitchen string to tie the legs together.
- Preheat the oven to 400 degrees F.
- Wash out the turkey with water. Pull out any remaining feather stubs in the turkey skin. Pat the turkey dry with paper towels. Lather the inside of the cavity with the lemon juice. Take a handful of salt and rub all over the inside of the turkey.
- For flavor, put in inside the turkey a half a yellow onion, peeled and quartered, a bunch of parsley, a couple of mini carrots, and some tops of celery. Close up the turkey cavity with either string or skewers. Make sure that the turkey’s legs are tied together, held close to the body, and tie a string around the turkey body to hold the wings in close.
- The neck cavity can be stuffed with parsley and tied closed with skewers. (I actually used toothpicks.)
- Rub melted butter all over the outside of the turkey. Sprinkle salt generously all over the outside of the turkey (if you haven’t soaked in salt-water brine – though I did both). Sprinkle pepper over the turkey.
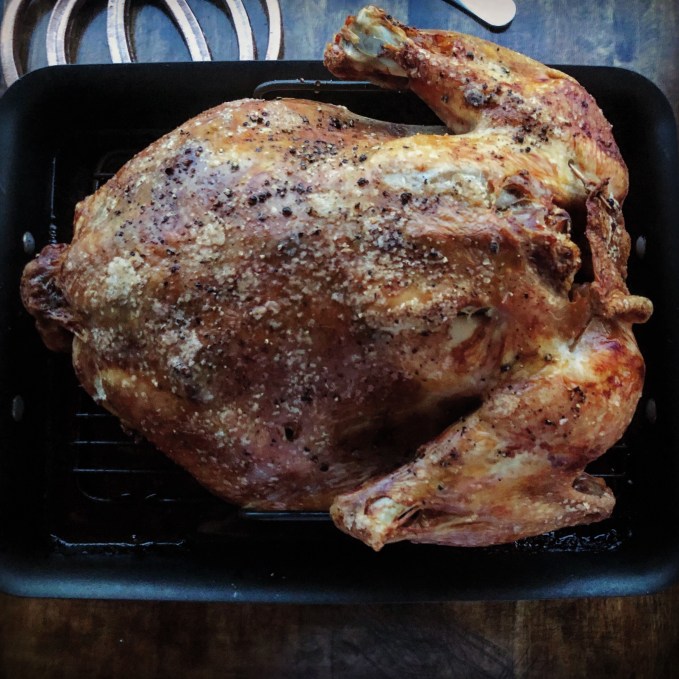
- Place turkey breast down on the bottom of a rack over a sturdy roasting pan big enough to catch all the drippings. Cooking the turkey breast down means the skin over the breast will not get so brown. However, all of the juices from the cooking turkey will fall down into the breast while cooking.
- Add several sprigs of fresh thyme and rosemary to the outside of the turkey.
- Put the turkey in the oven. Check the cooking directions on the turkey packaging. For a 15 lb turkey, start the cooking at 400 degrees for the first 1/2 hour. Then reduce the heat to 350 for the next 2 hours. Then reduce the heat further to 225 for the next hour to hour and a half.
- If you want the breast to be browned as well, you can turn the bird over so that the breast is on top, and put it in a 500°F oven or under the broiler for 4 to 5 minutes, just enough to brown the breast. Note that if you do this, you will have a higher risk of overcooking the turkey breast.
- Start taking temperature readings with a meat thermometer, inserted deep into the thickest part of the turkey breast and thigh, an hour before the turkey should be done. You want a resulting temperature of 175°F for the dark meat (thighs and legs) and 165°F for the white meat (breast). The temperature of the bird will continue to rise once you take it out of the oven, so take it out when the temperature reading for the thigh is 170°F, and for the breast 160°F. If you don’t have a meat thermometer, spear the breast with a knife. The turkey juices should be clear, not pink.
- Once you remove the turkey from the oven, let it rest for 15-20 minutes. Turn the turkey breast side up to carve it.
I was paranoid that my white meat was going to dry out. I began taking thermometer readings immediately when I turned the oven down to 225 degrees. It appeared as though the dark meat was overcooked and the white meat undercooked based upon my thermometer readings half an hour after turning the temperature down to 225 degrees (175 degrees, thigh meat; 150 degrees, breast meat). I decided to pull the turkey out and noticed pink juice running from the bottom when I transferred it to a serving platter. So I tented it in foil for about half an hour.
I had a feeling it was going to be undercooked. For the most part it was cooked perfectly. But the legs were slightly pink (we chopped them off and threw them back in the oven). My dad theorized that because the bird was roasted upside-down that the legs didn’t have a chance to cook enough. We both agreed we would rather have a bird that’s underdone than overdone.
All-in-all, my first roast turkey was a success. I might try to roast my turkey right side up next time just to see what happens.
Recipe rating: